I have added new feature to the filter: measuring the speed of the model using Doppler effect. More...
FlyHow is a simple system that visualizes how you control your glider. Since a picture is worth a thousand words I will present a small clip showing the FlyHow in action:
Debugging my discus launch (this is a DivX encoded video. If you cannot see it, download and install the free codec)
This video is in slow motion - it runs 10 times slower than normal. The scrolling number on the right side is framecounter - the video has 50fps, so each frame is 20ms. Slow motion and framecounter are added using AviSynth - excelent free video processing package for Windows.
The black transparent rectangle on the left corner is drawn by FlyHow. It visualizes the position of the control surfaces of the glider. In this video you can see left flaperon, elevator, rudder and right flaperon. Numbers show the amount of deflection of the trailing trailing edge in mm-s. Red and negative is up and left. Green and positive is down and right.
You probably noticed that the video had no sound. This is because the sound track was not used for real sound but for PPM signal sent by the transmitter.
This idea is really not mine - I got it from CRRCSIM-F3F audio interface. You take the PPM signal from the student socket of your TX and send it to the input of your audio card. The precision of the audio card is sufficient for measuring the timing of the PPM signal and extracting the position data for all 8 channels.
I connected the cable to the external microphone input of my camcoder and stored the PPM signal on the DV tape.
FlyHow itself is an AviSynth filter that analyzes the audio track as PPM signal, extracts the timing information for up to 10 channels and produces the video clip that shows the movements of the control surfaces. This clip is later overlayed over the original video using AviSynth Overlay filter that produces this nice transparent effect.
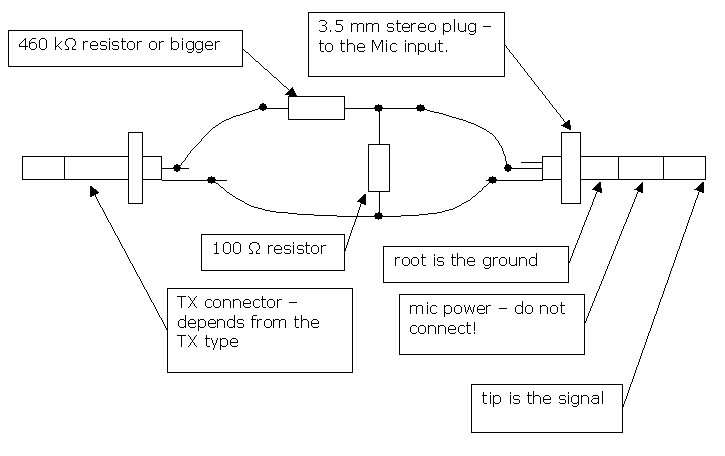
You need a cable. The cable is really simple: two plugs, two resistors and two wires.

The resistors are needed to lower the voltage. TX normally outputs 9V, but mic input sensitivity is around 0,2mV. I bought many resistors and then made the cable by trial and error. The original audio interface cable is made for soundcard line-in that accepts much higher voltage and does not require so much attenuation. But for use with camcoder mic input the upper resistor much be much bigger than suggested in the CRRCSIM page.
You do not need a video camera to test your cable. If it works with the mic input of your PC, it will also work with the camera.
Best test for the cable is to get the CRRCSIM-F3F working using the audio interface by connecting the cable to the microphone input.
The TX connector type depends from your trasmitter. I have a robbe Futaba FX-18 transmitter that uses simple 2.5mm mono audio plug. You can find this information for all kind of transmitters from the TX2TX page.
You must download and install at least AviSynth. I also recommend to install VirtualDub for previewing and encoding the videos. I use DivX for final encoding. If you need a general instructions about how to create a good looking and well compressed videos you should go through www.100fps.com site.
You must also download the FlyHow filter: flyhow.zip.
I have included both source code and Visual C++ 6 project file and a precompiled DLL for AviSynth 2.5.
Before you can start using FlyHow you must calibrate it for your plane. The idea is to measure the maximum possible deflections and the corresponding servo signal values.
For each channel you must find out:
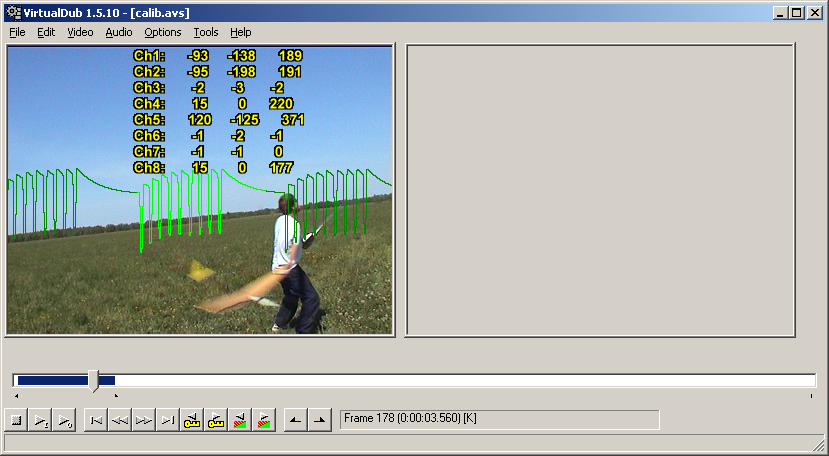
There is special FlyHowCalibrate plugin that shows the servo timing for each channel:

First number in each row is the servo position for the current frame. If you put the control into neutral position you can get the value for the servo center signal from the first column.
Second and third numbers and min and max servo signals. One of them is for maximum up and another for maximum down throw. Tape your plane (with FlyHow cable attached) and find out what is what.
Here is the AviSynth script that is used for calibaration:
#LoadPlugin("videotools\SmoothDeinterlacer.dll")
LoadPlugin("videotools\flyhow.dll")
LoadPlugin("videotools\audgraph.dll")
avisource("visual\test.04-06-05_14-16.00.avi")
separatefields()
assumeframebased()
lanczosresize(384,288)
#SmoothDeinterlace(tff=false, doublerate=true)
#BilinearResize(384, 288)
video=Converttorgb32()
FlyHowCalibrate(AudioGraph(video,1))
FlyHow supports currently crosstail gliders with up to four wing servos. Adding support for other configurations is quite easy.
I present the AviSynth script first and then explain the FlyHow parameters:
# prepare video

LoadPlugin("videotools\SmoothDeinterlacer.dll")
loadplugin("videotools\flyhow.dll")
avisource("visual\test.04-06-05_14-07.00.avi")
separatefields()
#assumeframebased()
#showframenumber(true)
#videoin=bilinearresize(360,288)
#videoin=bicubicresize(360,288)
videoin=lanczosresize(384,288)
#SmoothDeinterlace(tff=false, doublerate=true)
#videoin=BilinearResize(384, 288)

# create blank clip that is like original
overvideo = FlyHow( \
		AudioDub(BlankClip(videoin, width=Width(videoin)/2, \
		height=Height(videoin)/5, pixel_type="rgb32"), GetChannel(videoin, 1, 2)), 96, \
		"rudder",4,-3,-17,19,-518,597, \
		"elevator",2,-120,-16,10,400,-592, \
		"left_flap",1,-43,-22,23,-407,600, \
		"right_flap",5,68,-22,23,430,-595, \
		"",0,0,0,0,0,0, "",0,0,0,0,0,0)

# now overlay it
mutevideo=KillAudio(videoin)
Overlay(mutevideo, overvideo, y=(Height(videoin) * 4)/5 - 5, x = 5, mode="blend", opacity=0.5)
#assumefps(5)
FlyHow filter requires following parameters:
Configuration is mostly one-time thing, but you should repeat it when you change your planes setup (including changing the servo endpoints, etc).
The values for deflections are not critical, but the values for servo signals are critical.
I have already several ideas how to improve the system:
Some more videos. I later found out that plane was tail heavy and therefore the videos show really poor flying. Unfortunately the camcoder battery died before I found it out. I got one 8 minute 20 second flight later this day :)
Notice the launch settings: reflex, little bit of up elevator and right rudder.
How I learned to do rolls :) First video shows three rolls. I also added some explanations. Second video is same but plays five times slower:
I have added a new filter that can measure the speed of the model using the Doppler effect.
In order to use this filter you must attach a sounding device to the model that beeps on a constant frequency. I bought a small piezo buzzer that works without external circuitry and taped it to the model together with 9V battery. The speed measurement is only accurate if the plane is moving directly towards to the microphone or directly away from it. If the plane is also moving sideways then the measured speed will be lower than the real speed.
The filter is named Doppler and has three parameters:
The The DLG launch clips use this command for speed overlay:
Doppler(128,200,12)
I created the FlyHow for one reason: to become a better pilot. I think that it is a great way for teaching and training the complex manouvres like launching, thermal circling, etc.
I would really like to see the best DLG pilots and planes in action using FlyHow. So please share your videos. I can also provide some diskspace for the best videos. I also hope to get some suggestions how to improve my launch and thermal circling and how to trim the plane better. (I hope to get some better videos up soon).
I would like to thank all the people who created all those wonderful programs that I used: AviSynth, VirtualDub, CRRCSIM and CRRCSIM-F3F. Also the kind folks from the SALglider group who have helped me immensely with my DLG.